Set-up, like anything else new, can be somewhat daunting, especially if the environment is unfamiliar. However, after a few times navigating Facebook or Twitter, it becomes really easy. We will start this series with Facebook Page set-up for your business. If you don’t have a Profile account already with Facebook, we will need to begin with this first. Keep in mind that your Facebook profile may not be used as a page for your business, this is against Facebook's Terms of Use. However, your Fan Page will be connected to your personal profile.
Once you arrive at the Facebook homepage, set-up your account with your personal information as shown below.
Once you have been provided access to your profile homepage, now you can generate your business page. If you scroll to the bottom of your homepage, you will see an “Advertise” link.
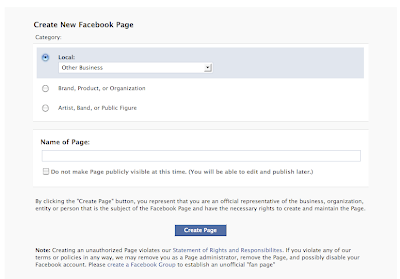
After clicking the link, the first thing you will see is create an ad link. You don't want this, click the “Page” tab (now we are talking business…no pun intended). The following page will appear and you will need to select create a new page. You will now have to define your business or product with the appropriate options. What you select on this page will determine some of the functionality of your business page. For example, if you have a storefront, you will have the capability of entering store hours in the “Info” section of your Fan Page.
One thing to note is that you don’t have to finish all of this in one sitting. You will have the opportunity to select, do not publish, which is what you want so that you don’t publish once you finish. In most cases, prior to publishing you will want to become comfortable with the functionality of the page.
Select the “Info” tab on your homepage and click on Edit. This will give you the opportunity to give some background information on your company, products, and services. This is a good area to have links to your website, blog, Twitter, etc.
Now for the fun parts…customizing your Fan Page! You can upload your company logo on the upper left screen. Select that area and you will be able to upload your logo. When you complete this step, go back to your homepage and enjoy your customized fan page.
Just below your logo, is an area where you can write a brief description of what your business offers. This is a critical area as Google searches this space for key words and determines your ranking. Complete this and voila! Your very own Facebook Fan page for your business. But before you celebrate, go ahead and publish for the world to see.
Congratulations, now you can start writing on your wall and inviting your friends to become fans! We will have an advanced post with more information to optimize content and add additional features to your web page. In the meanwhile, enjoy your Fan Page and begin engaging with your target market.


No comments:
Post a Comment